


Summer is a special season for me. I feel as though all of my favorite memories come from sunny summer days. Hosting pool parties, gardening with mom, summer camp, trips to Cedar Point, going to water parks, family vacations, water sports on the lake, concerts, festivals, and of course spending time crafting.
My mom would buy my sister and I craft supplies and craft kits throughout the summer to keep us from suffering boredom. I remember being able to go to the craft store and choosing a craft kit from the shelf. It was magical.
With so many beloved craft memories from summer days, I have been inspired to create this Mermaid Headband Craft Kit.
This DIY post is specifically for a purchased craft kit that you can find on my Etsy shop.


Mermaid Headband Craft Kit Instructions
This craft kit is recommended for all skill levels; however, due to the potential use of a hot glue gun and small pieces (chocking hazard) parental supervision is required.
Step One: Order Your Craft Kit
You will first need to order your craft kit from my Etsy Shop HERE.


Step Two: Gather Your Supplies
In this purchased kit you will receive:


- Precut Blue Felt Seaweed 3
- Precut Lime Felt Seaweed 2
- Precut Deep Green Felt Seaweed 2
- Precut Pink Felt Seashells 2
- Precut Orange Felt Starfish 2
- Precut Tan Felt Sand Dollars 2
- Pearl Beads 5
- Stretch Nylon Headband One Size Fits All
- Extra Pieces
- Adhesive not included
Additional Information:
- Felt pieces range in size
- Green Seaweeds are 4×4 inches in size
- Long blue Seaweed is about 2×5 inches in size
- Small Starfish is 2×2 inches in size
- Large pink Seashell is about 3×3 inches in size
- All Felt pieces have been stiffened to prevent the shapes from becoming floppy
- Headband truly is one size fits all, I have a big head so don’t fear because it will fit


- Additionally, you will need adhesive to hold your project together. I highly recommend using a glue gun; however, if your would like to use felt glue you can.
- Hot glue will dry quickly for a faster project time (nice for parties).
- Felt glue is much safer because hot glue can burn you.
- Felt glue will take a while to dry, meaning you may have to wait overnight for your headband.
- Pearls can only be glued to the felt by a hot glue gun (to my knowledge), but if you are not using hot glue at all you can sew the pearls in place.
So many pros and cons, but adhesive choice is totally up to you.
Step Three: Assemble Your Seashells
Simply assemble the shells and set them aside for later, as shown below.


Step Four: Creating a Cardboard Work Space
Your craft kit will arrive in a small box with everything you need! To create your cardboard work space cut along the fold of the lid off of your box. Remove the lid and you will have your workspace.


Step Five: Stretch the Headband Across Your Cardboard


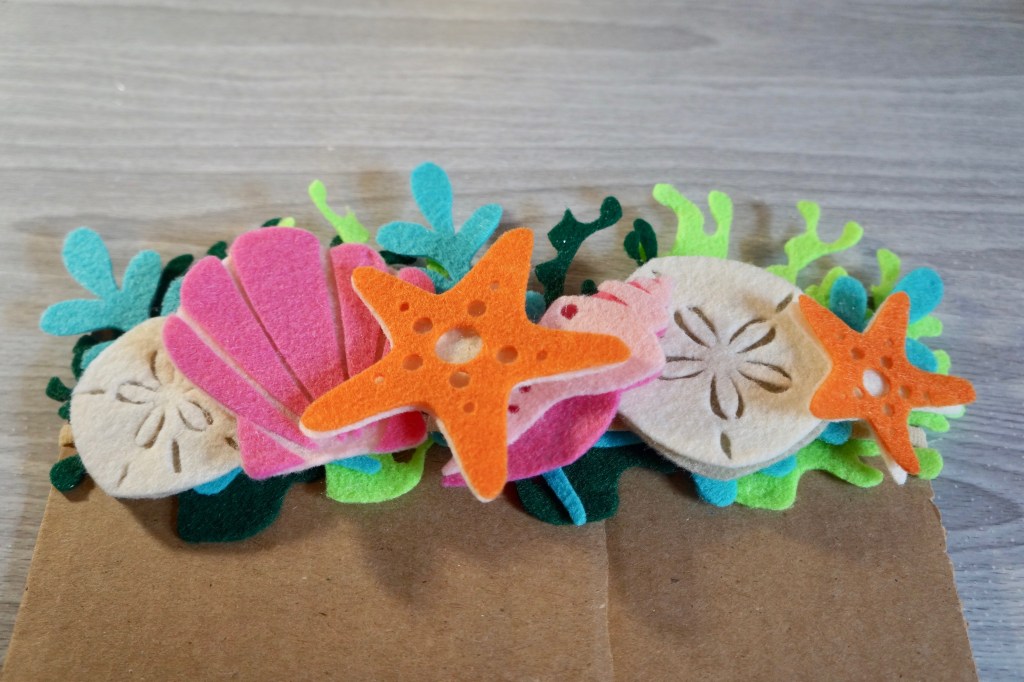
Step Six: Attaching Your Seaweed to the Headband
Position Your Seaweed:
All of the seaweed will go under the headband.


Laying out the seaweed before glueing it will allow you to play with the positioning to find the layout that looks best to you.

Glue Your Seaweed:
All you are doing here is securing the seaweed to itself. Worry about securing the seaweed to the headband later. To do this simply lift up small sections of top seaweed shapes and glue them to the seaweed shapes underneath.


Step Seven: Attaching Your Seashells to the Headband
Position Your Seashells:
Again, before glueing anything down lay out your shapes and play with the positioning to find the layout that looks best for you.


Glue Your Seashells:
After you have your seashells in place where you would like them, lift small sections of the shells to glue them to the headband while preventing your shells from shifting out of position.


See how the glue in the left picture above shows placing glue on top of the headband? In this step you will be sandwiching the headband between the seashells and the seaweed. Doing this keeps all of your pieces in place when you remove it from the cardboard workspace, keeping its shape and length.
Smaller shells can be lifted to better control the amount of glue used.


Voila!


Step Eight: Remove Your Headband from the Cardboard


If you run into issues removing the headband from the cardboard don’t worry. Small bits of hot glue sticking to the cardboard is no big deal. Remove the pieces of cardboard that you can and the rest of these blemishes will be in the back of the headband where no one will see it anyways. Don’t fret it still looks beautiful!
Step Nine: Attaching the Pearls to Your Headband
This is an optional step and as you can see below the headband looks good both with and without the pearls.


You can glue the pearls to your headband with hot glue as shown below, or you can sew them in place. Whichever is easiest for you.


Step Ten: Enjoy!


Now you are ready for all sorts of mythical adventures to enjoy this summer!
Your headband looks great!


