

This DIY post is specifically for a purchased craft kit that you can find on my Etsy shop.
If you have seen my Etsy shop or have made your way over to my shop on this site here, you have seen the wide variety of felt banners that I sell.

Christmas Tree Banner Craft Kit Instructions
Making this kit goes beyond just a craft. While making the banner, you and your loved one will have made precious memories that you get to relive year after year as your craft becomes a decoration and a true part of your family’s Christmas traditions.
Step One: Purchase Your Craft Kit and Gather Your Supplies
You will first need to purchase your DIY Kit from my Etsy Shop HERE
There are also other craft kits in my Etsy shop with instructions in my blog here if you would like to see other whimsical crafts to try.
In this purchased kit you will receive:

- One Precut White Felt Banner
- Precut Felt Tree: In four pieces
- Precut Felt Ornaments: Nine of each color
- Precut Felt Yellow Star Topper
- Precut Felt Squares
- Red, Green, and White Twine
- Dowel Rod
- Adhesive Not Included

Additional Information:
- Banner is about 8.5 x 9.5 inches in size
- Banner has precut holes to thread the wooden dowel through
- Dowel Rod is 10 inches in length and 0.25 inches in diameter

*Additionally you will need adhesive to hold your project together.
I recommend using a glue gun; however, if you would like to make this a more child-friendly project feel free to use felt glue.
A glue gun provides a shorter waiting time for drying, allowing your project to be finished sooner. (Which is nice when photographing step-by-step directions)
Felt glue will work fine, but there will be delayed crafting as you wait for the glue to dry.
It is up to you, so long as you do this craft safely and have fun.
Step Two: Attach the Dowel to Your Banner
Place the dowel rod through the two holes on the top of the banner.


Step Three: Add the Twine
Attaching the Twine:
First, you want to flip the banner dowel-side up (as in the picture below).
Next, you will be threading your twine through the same holes as the dowel, one side at a time.


Once the thread is through, tie it to the dowel.


Follow the same steps on the other side of the dowel.
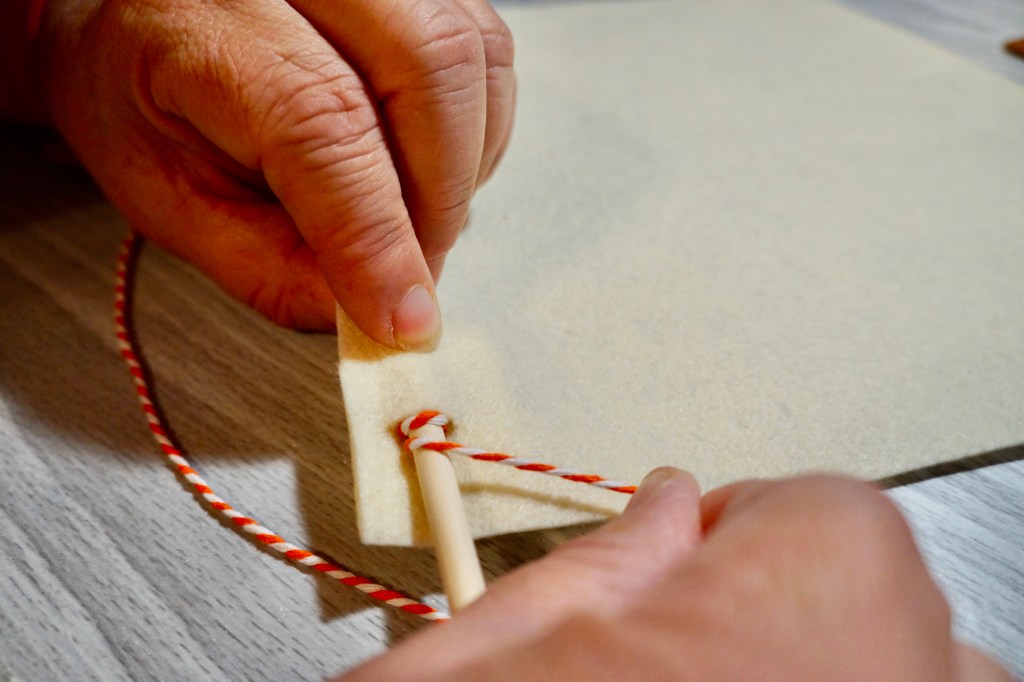
Securing the Twine to the Back of the Banner:
For this step you will need the two felt squares provided in your kit.
Lift your felt square and add glue to it. Then, place it over top of the knotted twine on the back of the banner. This will hold your twine in place once the glue is dry.


**Tip: when placing the square over the dowel and twine, gently fold it over while keeping the banner itself flat. This will ensure that the banner will not have a large crease on the front.
Shortening the Twine After Securing Your Knots:
Simply wrap the twine around the dowel in the front of the banner.

(These photos are from my Turkey Banner Craft Kit Instructions.)

Repeat on the other side to keep things symmetrical
Step Four: Layout Your Tree
Before you add glue to anything, you can layout where your tree needs to be placed on the banner; this way, you will be able to make adjustments before you glue things down.


Building Your Tree
Step Five: Glue Your Brown Tree Base to the Banner

The Brown Tree Base will help you to align the green layers, as well as creating a stump for your tree.
It is like a helpful guide for your tree puzzle pieces; however, if you do not want to use it that’s cool too. Your Christmas tree banner will look great either way.
Step Six: Attach the Green Pieces of your Tree
Start with the darkest green tree piece and lay it at the bottom of the brown tree base. Starting from the bottom will help you lay out the green pieces a bit easier, so that they will perfectly align over top of the brown base. We want to cover the base completely.
You may even want to lay out all of the layers before you start gluing, and then glue in sections.


Once the bottom green layer is attached to the brown base, add your next layers working your way to the top of the tree.


Step Seven: Attach the Star Topper


Step Eight: Attach Your Ornaments to Finish Your Masterpiece
Look at all of the color options!
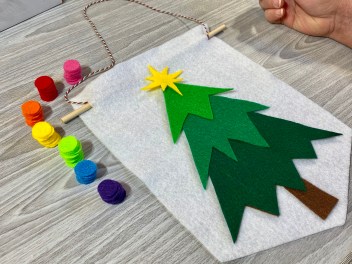
You Could Make a Rainbow Tree


Or Maybe You Just Want a Monochromatic Look


Step Nine: Enjoy!

Whatever color combinations you have chosen I know it looks beautiful!
If you purchase this product or create a something inspired by this DIY please share your photos either in the comments below or on Unplanned Whimsy’s Facebook Page HERE because I’d love to see them!
